My dear friend from the elementary school made me the most beautiful coiled bag for my birthday in 2015.
I really wanted to try this. She told me how to make it and I bought the supplies for it. It really looked like a daunting project so it sat. And sat. And sat. I didn't attempt to make it until New Year's.
Here's my first attempt.
I found this to be a very challenging project. The bag that was given to me has the fabric sewn onto the rope. I wrapped my fabric around the rope instead. It works equally as well, but the raw edges show and begin to fray.
Here's my second attempt. This time I did sew the fabric onto the rope. I asked my friend to come to my house and help me. We chatted and sewed/knitted together. I am pleased with this bag. The sewing was still difficult because I folded both raw edges to the middle which left a lot of bulk to sew.
I knew I could do better and tried my friend's way of only folding one raw edge to the middle. This is working much better and below I will show you how a tutorial for the project.
The tutorial is for this orange bag.
Step 1: Gather your materials. I bought 1 yard each of coordinating fabric. You need not buy fabric. Scraps from your stash will do just fine. JoAnn's had a 50% off sale so I bought a bit more than I needed. You will only need about 15 inches of each of the four fabrics. Also, you need 100 feet of clothes line. I have purchased it both at JoAnn's and Menards. The one from JoAnn's is more flimsy and easier to work with. The one from Menards is stiffer, which leads to a heftier bag.
Step 2: cut 1.25 inch strips of fabric. I cut 10 of each of the four fabrics. I have enough left over to make the lining of the bag out of any one of those fabrics.
Here are my strips of fabric all cut out.
Step 3: Sew all fabrics end to end in a random pattern. Here's the heap of 100 feet of 1.25 inch wide fabric.
Step 4: fold over one edge to the middle and press.
Here' the fabric all pressed and ready to go.
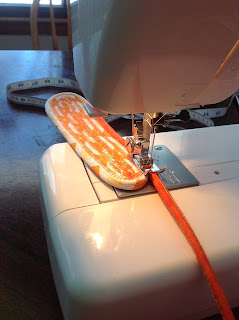
Step 5: Sew the fabric to the rope. The first bit is a bit tricky. Fold the short edge over the top of the rope, then fold in the sides. Do your best and pin it to help you get started.
Here's a very short video on how I sew the rope.
Meanwhile, stop and make some Lofthouse Sugar Cookies! YUM!!
Here I sewed about 70 feet of rope. I decided to start coiling and see if I need to sew any more fabric onto the rope.
Step 6: Fold end in about 6 inches or to desired length. Make sure it folds to the left.
Start sewing at the fold and work toward the tip of the rope.
This is what it looks like after a few rounds.
Continue sewing until you reach your desired width. I wanted a bag slightly bigger so I went to 12 inches.
Step 7: making the sides. Here it starts to get tricky. Lift the bag up as high as it will go and continue sewing.
A backside view.
Another view.
You can see the sides taking shape.
Here's the end of my 70 feet. Time to sew more fabric onto the rope. UGH!
Sorry for the poor photography in the last batch of photos. That would be my sons taking the pictures with my iPad.
A two hour delay this morning meant I had time to sew my bag some more.
Here's the end of the 100 feet of rope. I had some extra left over from the green bag so I sewed the two ends together. I have a little more to go. Here you see the pink bag inside of the orange one.
Ta da! It's done!! I added handles and a lining for the inside of the bag.


